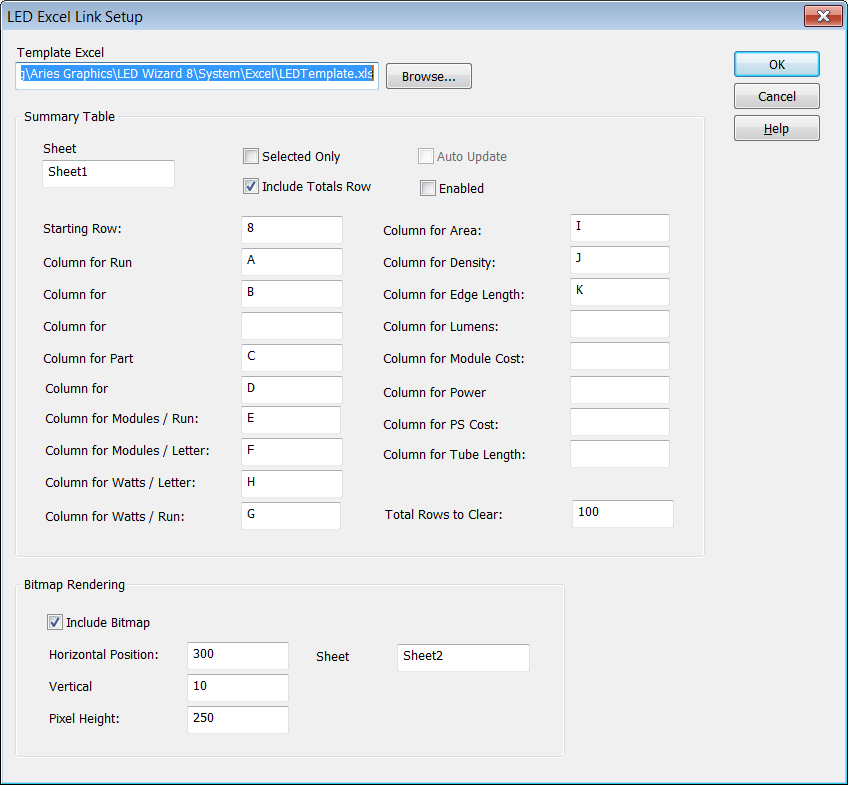
The Excel integration features makes it a snap to use the various data generated by LED Wizard with Microsoft Excel. This dialog box lets you configure how the LED data is sent to Excel.
The way this works is by utilizing COM (Component Object Model), which is a Microsoft technology that separate, independently developed software programs can use to control each other's operation and exchange data in real time, without the need for clumsy and slow file transfers or copy/paste via the clipboard.
If you use Excel to make additional calculations for estimates, pricing, and/or inventory, this can be a very powerful capability.
Setup Dialog
The following is a description of the configuration dialog box for the LED Excel integration feature:

Template Excel File
This is the path of the XLS file that will be used as the template file. You can create a template with cells reserved for the LED data, plus any other data you would use. This file can be a starting point that you customize, or you can start with your own file.
Sheet Name
Enter the sheet name to use for the LED summary data.
Selected Only
Check this if you only want the selected object to be given to Excel, and never the entire layout's data.
Auto Update
This controls whether Excel is updated whenever you change the layout. With this unchecked, you have to select Update Excel yourself to update Excel.
Enabled
Uncheck this to disable this feature of LED Wizard.
Include Totals Row
Check this to include the totals at the end of the table. If not using either Feet + Inches option, you can let Excel do the totals if you want.
Starting Row
This is the row where you want to start the data.
Column for Run Numbers
Enter the column for run numbers (blank for none).
Column for Brand
This lists the brand of LED used.
Column for Part #:
This lists the LED part number used.
Column for Letters
This lists the name of the graphic, typically an individual letter. The Name field on the LED Property Bar lets you specify this.
Columns for Modules / Run
This lists the total modules per run. A run is a single connected series of modules.
Column for Modules / Letter
This lists the total modules per letter. A letter is a single named graphic or individual letters inside of a single text graphic when the text is created within the program rather than imported. You can use the Name field on the LED Property Bar to set the Letter in the layout.
Column for Watts/Letter
This lists the total watts for the most recent letter listed in the table.
Column for Watts
This lists the watts for this run.
Column for Area
This lists the area for the letter the LED path was derived from. This will not work on files created before version 6.5.33.
Column for Density
This lists the density, which is defined as the letter module count divided by the area (above).
Column for Edge Length
This is the total perimeter length of the vector graphics.
Column for Lumens
This is the total lumens of all the modules. This doesn't represent an accurate lumen output through teh sign face, but is simply a total to be used as desired in some cases.
Column for Module Cost
This is the total cost of the modules for each letter (if you have entered module prices).
Column for Power Supply
This column lists each power supply used.
Column for PS Cost
This column lists the cost for each power supply, if a price is specified for the power supply.
Total Rows To Clear
This is the maximum number of rows the data section in the Excel file is likely to be. It it used to clear the file of any existing data.
Include Bitmap
Check this to include a bitmap rendering of the LED module design.
Horizontal Position
Enter the bitmap's horizontal position. This is normally not entered manually; when you move the bitmap into position within Excel, the Wizard will detect this new position the next time the bitmap is updated in Excel, and store the new position in the Excel settings in the registry. This value is not a row or column but a different scaling used for bitmaps.
Vertical Position
Enter the bitmap's vertical position if necessary.
Pixel Height
Enter the bitmap's pixel height.
Sheet Name
Enter the name of the Excel sheet to use for the bitmap.
 LED Wizard 8 Documentation
 LED Wizard 8 Documentation