A critical step in the process of designing and producing channel letters is defining where the holes are positioned on the letter backs and/or the sign cabinet. These holes could be for mounting the sign and/or for the module and power supply wiring.
The Auto Mounting Holes Tool makes it a snap to create mounting holes for an entire job in just a few minutes. The basis for this tool is that you can define the vertical and horizontal positions of these holes automatically, based on a few input parameters.
The tool works by letting you preview a layout of holes, make various adjustments, and then, when the layout is correct, press "Add Holes" to actually create the holes.
Here is the property bar and a description of the options.

Size
This is the size of the hole to use. To make a new Size, enter the value here as a decimal, and then also give it a Name in the next field, and then click on the green "+" symbol to add it.
Name
This is the name of the hole to use. The Name can be the same or different from the Size entered in the previous field.
Inline
This is the amount to inline, or offset, from the return for automatic positioning of the holes.
Max HS
This setting defines the maximum spacing between holes when using the Distributed mode. For example, you may have a cabinet where you want to enter a mounting hole every 12 inches.
(predefined holes)
The first drop down list shows the predefined mounting holes that you can select from. These are created from entering new Size and Name values and then saving them.
(number of rows)
The second drop down list lets you select the number of rows of holes to create, based on the horizontal guidelines. You can easily reposition these holes by dragging the guideline up or down.
(holes layer)
The third drop down list lets you select the name of the Layer for the holes, or create a new layer.
(crosshairs layer)
The fourth drop down list lets you select the name of the Layer for the crosshairs, or create a new layer.
Left Aligned
Press this to add holes to the left edge of the stroke.
Center Aligned
Press this to add holes to the center of the stroke.
Right Aligned
Press this to add holes to the right edge of the stroke.
One, two, or all three of the Align options can be selected. Be sure to press the Preview button after each edit.
Distributed
Press this to distribute holes across the stroke, with a maximum space being that defined by the Max HS field, above.
Add Crosshairs
Press this button to add crosshairs at the center of the holes. This would be used in shops that drill the holes instead of routing them.
Even Vertical Spacing
If you've entered more than two guidelines, this option will evenly space them vertically.
Lock Guideline
This will lock the guideline so that you do not inadvertently move it during any editing.
Add/Remove Holes on Selected Guideline
This option will add or remove all holes on the currently selected guideline.
Add Mounting Hole Preset
This is the final step to add a new mounting hole preset. After you click on this icon, the new hole will be shown in the predefined holes drop down list.
Remove Mounting Hole Preset
This will remove the currently selected mounting hole.
Preview
Click on this icon to update the tool with any changes. Note that making a new selection of a hole, or the number of rows of holes, etc. will not take effect until you click on Preview.
Add Holes
Click on this icon when you are finished and you want to add the holes to the layout. The holes will not be added until you clik this. This tool operates in a Preview mode until you're finished. If you click out of the tool before you click on Add Holes, the holes will be lost.
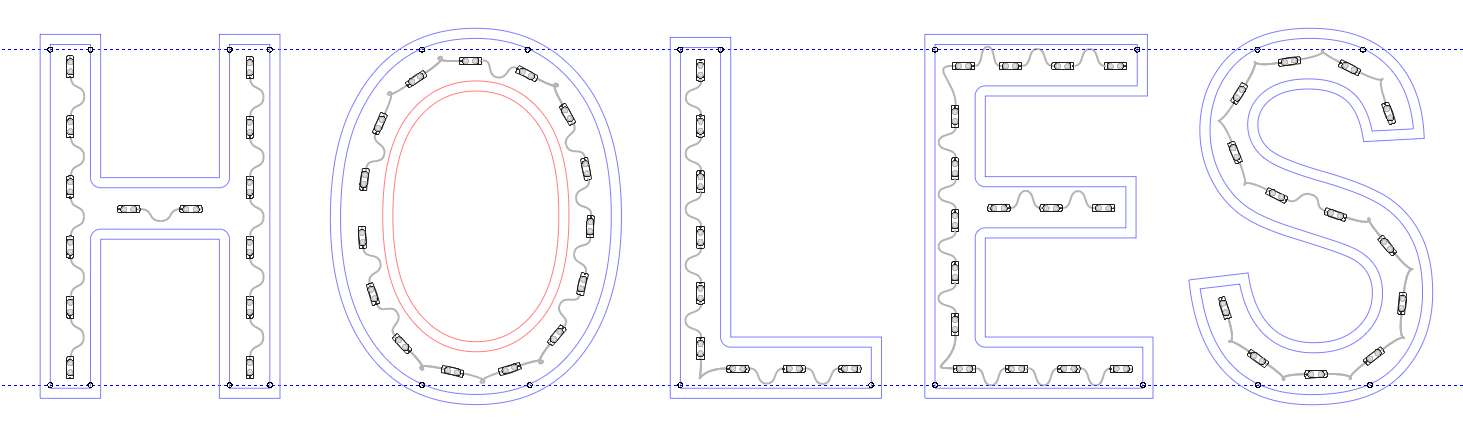
Here's an example of a 30" tall channel letter set with two rows of mounting holes along the top and bottom, with a 1" offset from the return, and 1/2" holes along the left and right of each stroke.
 Please Note: if you want to add another set of holes that are a different size, then you must run the tool again and select the new size.
The mounting holes and the crosshairs will be added on different layers, and therefore can be exported selectively.
 LED Wizard 8 Documentation