The Flex tab is used to access the various tools for creating LED Flex Tube layouts.
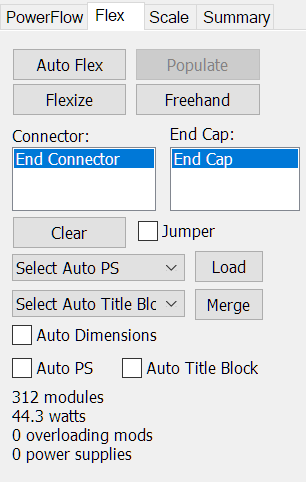
Auto Flex
Press this button to access the Auto Flex Layout tool.
Populate
Press this to Populate the layout when using the Auto Flex Layout tool.
Flexize
Press this to "flexize" the selected object, which may or may not have open paths. It will use the last selected LED Flex brand and module. You can use the Auto Flex button to select the module, and then press Flexize to create the LED Flex population.
Freehand
Press this to launch the Flex Draw Tool tool.
Connector
This list is the available flex tube connectors to use with the current flex tube population.
End Cap
This list is the available end cap connectors to use with the current flex tube population.
Clear
This button clears the selected flex population.
Jumper
Click this to add a jumper to the c
Select Auto PS
Select the power supply loading scheme to use when the Auto PS option is checked, or the Load button is pressed. This loads the current population with the selected power supply, using this loading scheme.
Select Auto Title Block
Select the title block to use when Auto Title Block is selected, or Merge is pressed. This merges the title block with the current LED document.
Load
This loads the current population using the power supply loading scheme selected in the Select Auto PS list, above.
Merge
This merges the current population with the title block selected in the Select Auto Title Block list.
Auto Dimensions
Check this option to have the graphics have dimensions automatically added.
Auto PS
Checking this will cause the population to be automatically loaded with the power supply currently selected in the PS Tab.
Auto Title Block
Checking this will cause the title block selected in Select Auto Title Block to be automatically merged with the population when the Populate button is pressed.
 LED Wizard 8 Documentation